Hi (Oh my God… he just started his blog post with ‘Hi’),
Did you know that as of Rails 3.1, you can have nested has_many :through clauses in your models? Here is a concrete example to understand what I mean:
[ruby]
class SportSchedule < ActiveRecord::Base
has_many :gamedays
has_many :games, :through => :gamedays
has_many :results, :through => :games # <= You could not do this before Rails 3.1
…
def has_results?
!self.results.empty?
end
end
[/ruby]
↧
Nested has_many :through
↧
Run bundle install with the –binstubs option
It’s been a little while that I have decided to always extract my gem binaries into my rails application “bin” path. That way, I always execute binaries by specifying the relative path. For example “./bin/rails g model User”. At first I wasn’t sure about the idea. I was like: “Wait a minute! I will have to type “./bin/” all the time?! It will get annoying really fast!”. This turned to be an unfounded fear. Having to type “./bin/rails” or “./bin/rake” is a good thing and it feels really natural. When you do this, there is no magic involved: you know exactly WHICH binary is going to be executed.
Isn’t it exactly like typing “bundle exec” ?
Yes, you’re right… it’s more or less the same thing. But I find that having to type “./bin/” is even more obvious. Believe me, you will get the hang of it quickly. Anyway, with TAB completion, it’s not like you have to type “./bin” really. It will look more like “./b” then TAB. It becomes second nature really fast.
Wow! This is the discovery of the century! I’m sold, how can I do this ? (end sarcasm)
Whenever you update your Gemfile, you do
bundle –binstubs
↧
↧
Make sure you are not using methods like "1.day.ago" when dealing with a Date column
TL;DR: Read the title 
I spent too many hours debugging a feature spec in an application. Turns out I was simply not paying attention to what I was doing!
In a fixture file, I was setting a field the following way:
some_date: <%=1.day.ago.to_s :db%>
I didn’t pay attention to the fact that “some_date” was a Date and not a DateTime. This single line was responsible for some intermittent failures in my test suite.
The technical explanation
The problem is that methods like “days.ago” return ActiveSupport:TimeWithZone objects which contain, well, the time portion along with the current timezone info. Then there is the to_s(:db) part which convert the resulting DateTime in UTC for storage in the DB. It means that if I call “1.day.ago.to_s :db” on september 7th at 8:00 PM (local timezone, which is UTC -4 for me), the result will be “2014-09-07 00:00:00” UTC time. And since I was storing this in a Date column, the time portion would simply gets discarded… so I ended up with a date of September 7th instead of the expected September 6th in the DB.
Solution
Of course this problem was very easy to fix once I understood what was causing it. I simply changed the fixture file so that it looks like:
some_date: <%=1.day.ago.to_date.to_s :db%>
This works as well:
some_date: <%=Date.yesterday.to_s :db%>
Hoping this will save others some painful debugging!
↧
Keeping secrets secret without using .gitignore
In the past I used to keep all files containing sensitive data (passwords, api keys and other secrets) out of my git repository. For example, I would add database.yml in the .gitignore file. Then I would put my database.yml on my production server in the « shared » folder. Finally I would ask capistrano to create a symlink to that file in the deployment recipe. This has been fine with me for a while.
But one day, a small gnome came in my home office, all dancing and laughing. So i said : « what are you doing here, little gnome? ». He first told me that I should not speak to him aloud like that, as it would probably scare my wife and my kids and that they would start being concerned with my mental health. « Good point, I kept to myself ». Then, he told me : « There is a better way! You don’t have to rely on .gitignore if you don’t want to expose your secrets. Let me show you how…»
Since that day, my application files that contain secrets are in my repository. And, as you probably guessed, I use environment variables in those files instead of plain-text secrets, exactly like it is suggested in the secrets.rb file of a rails project. You probably have seen it already:
# Do not keep production secrets in the repository,
# instead read values from the environment.
production:
  secret_key_base: <%= ENV["SECRET_KEY_BASE"] %>
Hey, It’s not rocket science! Why a blog post about this!?
Because I struggled at first to set these environment variables correctly. How to set the variables in developement? How to set them in production?
At first I tried using the rbenv-vars plugin both in development and in production. rbenv-vars is a simple plugin for rbenv that let you declare environment variables in a straightforward manner. You just create a .rbenv-vars file in your application directory that looks like this :
DB_USER=db user
DB_PASS=db password
aws_access_key_id=some access key here
aws_secret_access_key=secret access key here
And you’re ready to go (as long as you use rbenv!). Of course this file should not be in your repository as it contains secrets. And since the file is not really a part of your application to begin with, adding it to .gitignore makes complete sense. Anyway, to the point. rbenv-vars worked perfectly on my development machine, so I decided to use it in production, but it didn’t work very well this time.
The Phusion Passenger gotcha
On one of my production server, I use Phusion Passenger, and no matter what I tried it would not set the environment variables configured in my .rbenv-vars file. I know others had success with this approach but it didn’t work for me.
If you use Phusion Passenger (>= 5.0) like me and .rbenv-vars doesn’t work for you neither, just set the environment variables in your nginx or apache configuration file, like this (I use nginx) :
server {
  listen 80;
  server_name mygreatapp.com
  root /home/username/apps/mygreatapp/current/public;
  passenger_ruby /home/username/.rbenv/versions/2.2.4/bin/ruby;
  passenger_enabled on;
  passenger_env_var SECRET_KEY_BASE supersecret
  passenger_env_var DB_USER mydbuser;
  passenger_env_var DB_PASSWORD shhhItsSecret;
}
All in all I’m really happy with this approach. It allows me to keep files like secrets.yml and database.yml in my repository (instead of gitignoring them) without exposing passwords or other secrets.
↧
My brief rant against SPA
I know I sound like an old coot whose afraid of change, but there is something that doesn’t feel right for me with the new Single Page Application craze. It’s like all of a sudden, we’ve decided that web applications are crappy and that we want a return to traditional client/server applications. It’s a if we cannot tolerate a page refresh anymore and we want to manage the state of our applications like we were doing in 1995!
Would StackOverflow be better for the end user if it was built with Angular or Meteor? Nope. There are use cases where SPA shine, I can understand that. But for a standard web application or a website? I don’t believe it is needed. The web has been built around the idea of resources. Each URL on the web is supposed to be a document, not an app that you download. We have to come to our senses here. We should not work against the fundamentals of the WWW. If we destroy the basics of the web because of our thirst to create rich client applications, we’re doing a terrible mistake.
↧
↧
How to backup your postgres database on SpiderOak using Dokku
Now that we know how to setup a rails application using Dokku on a DigitalOcean droplet, it might be a good time to think about automating our database backups. If you haven’t read the first part, you should do it before reading any further.
Sure, you can enable weekly backups of your whole droplet on DigitalOcean (the cost is minimal), but for a database it is wiser to backup at least once a day. Let’s configure the whole thing. We are freelancers (or small development teams) and we are used to get our hands dirty and do stuff by ourselves. It’s not a question of not having enough money to pay someone else, it’s because we are smart and resourceful! See, it already feels better when we see it in this light!
We will use SpiderOak to store our backups. Their zero-knowledge architecture will make sure our data remains private.
UPDATE: Whilst SpiderOak is not free, they offer a 60-days free trial for 2GB storage (no credit card required). After that, the cost is $7 per month for 30 GB storage. Thanks to NoName in the comments for asking me to clarify this point.
Create an account on SpiderOak
We will first install the client on our local workstation and create our account.
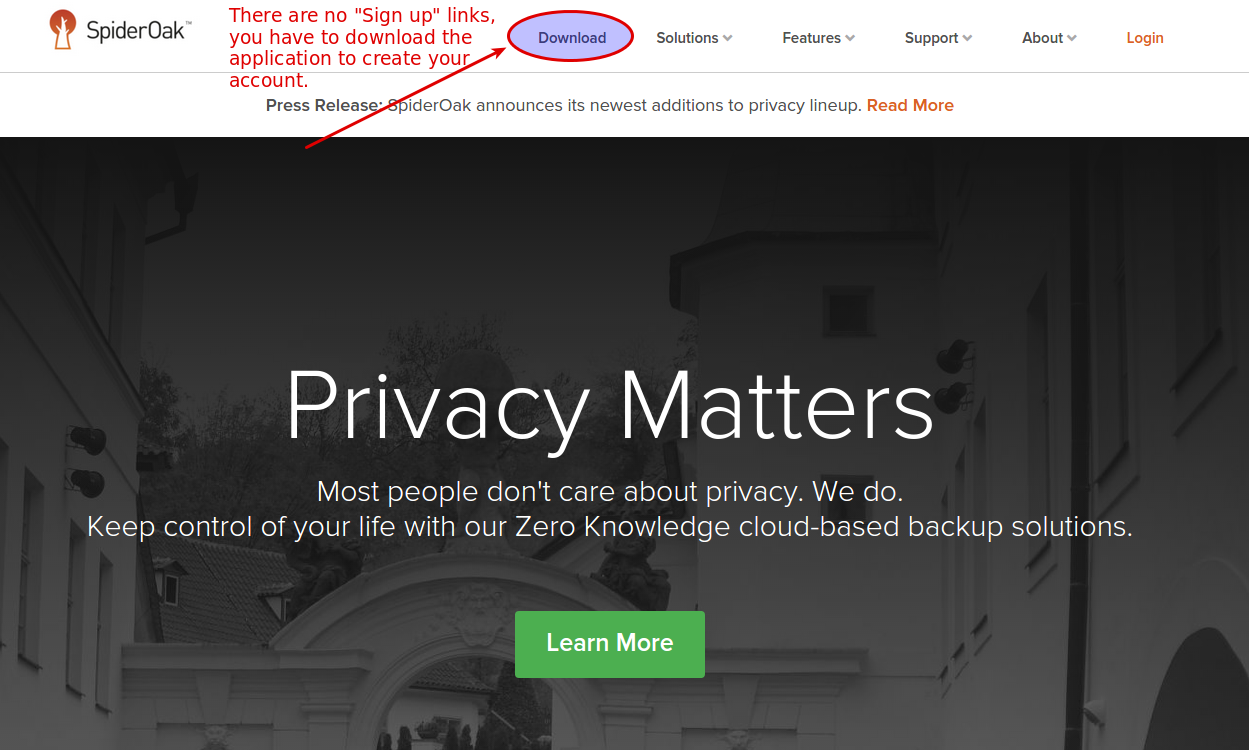
On the SpiderOak page, click on downloads
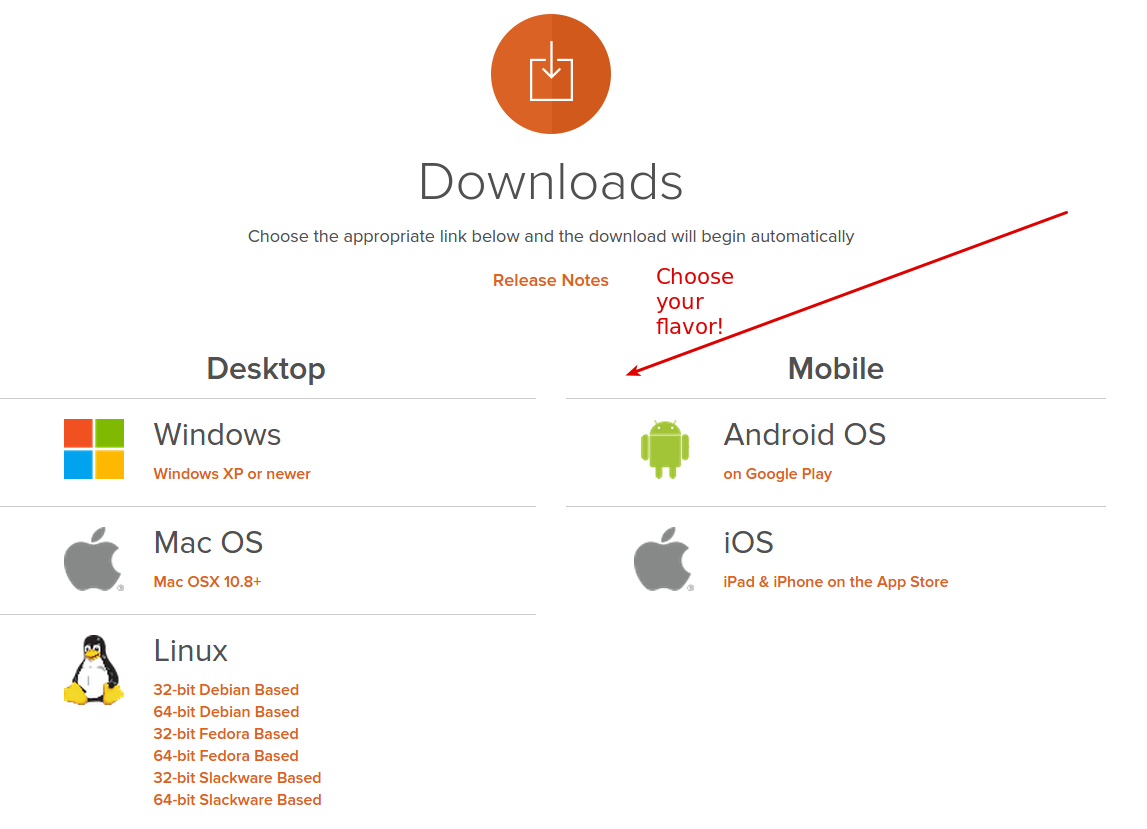
Then, choose the correct client for your distribution:
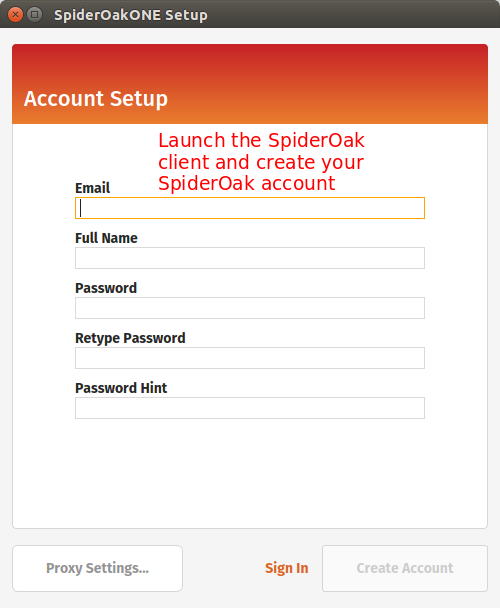
Run the installer. You should be presented with the following screen:
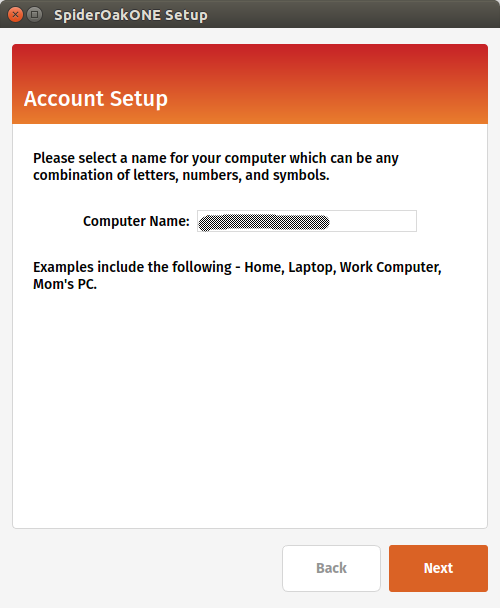
Next step is to register your local computer with SpiderOak.
Finally, you will be presented a screen to select what you want to sync from your local computer to the cloud. You can leave the default options for now:
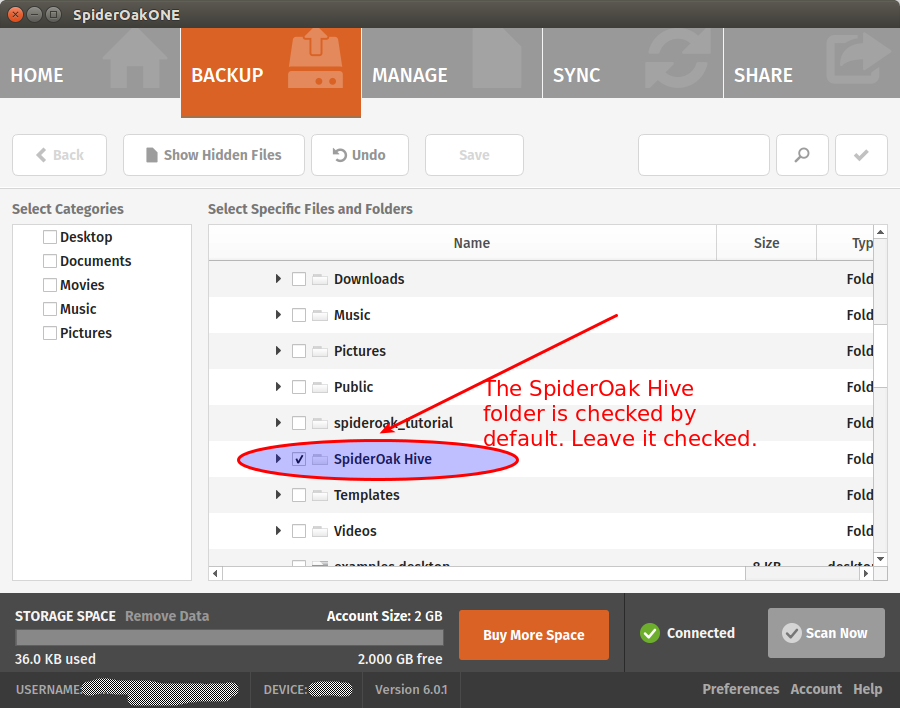
We won’t use the SpiderOak “Hive” folder
SpiderOak creates the SpiderOak Hive folder in the installation process. All files added to the Hive folder of a device are automatically synced to the Hive folder in every other devices. It is a convenient way to have things running quickly without configuring shared folders manually. One problem of using the Hive for our backups is that it will sync everything. You put something personal in your Hive on your local computer and oops, it will be sent to your droplet! That sounds not very good to me. For this reason, we should disable the Hive Folder syncing.
Still on your local workstation, go to your SpiderOak preferences:
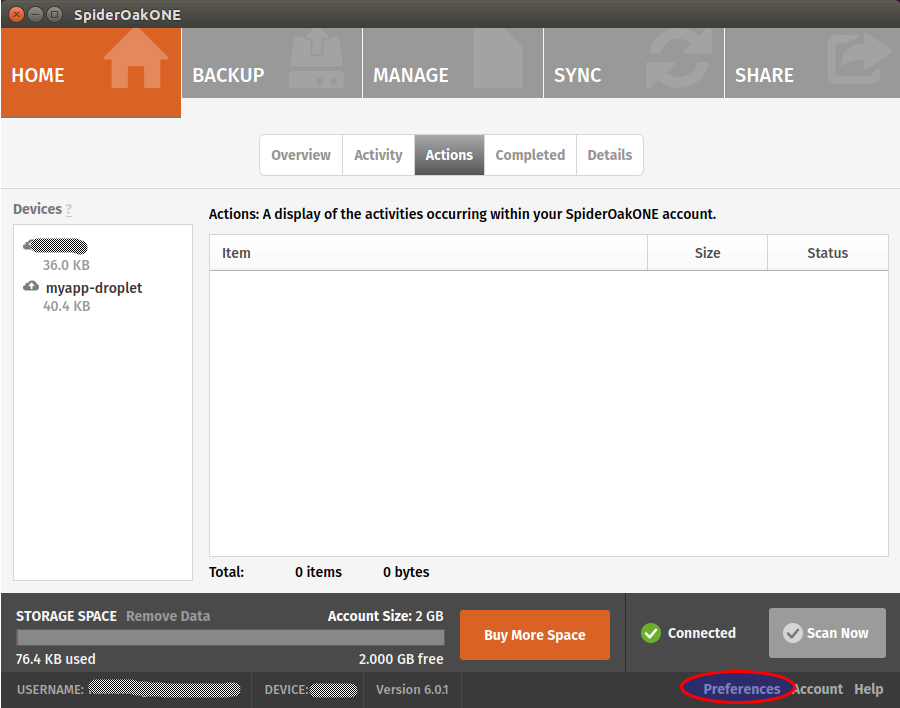
And disable the hive:
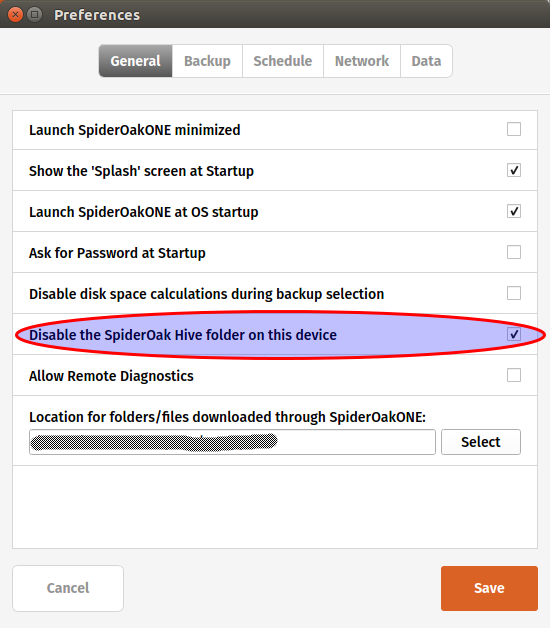
Note that if you don’t mind syncing your personal Hive on your DigitalOcean droplet, you can leave the option enabled.
Add your droplet as a SpiderOak device
Log to your DigitalOcean droplet by typing:
ssh root@your-domain-or-droplet-ip
Open your sources.list file
nano /etc/apt/sources.list
And add the following line at the end:
deb http://apt.spideroak.com/ubuntu-spideroak-hardy/ release restricted
Save, exit and run
apt-get update
If you get the following error:
W: GPG error: http://apt.spideroak.com release Release: The following signatures couldn't be verified because the public key is not available: NO_PUBKEY A6FF22FF08C15DD0
Look at it straight in the eye and IGNORE IT without showing mercy.
You’re now ready to install SpiderOak
apt-get install spideroakone
We must now configure SpiderOak but we don’t have any GUI on our server. What will we do? Simple, we just run the following command:
SpiderOakONE --setup=-
You will have to provide your SpiderOak login info.
Login: your@login.com
Password:
Logging in...
Getting list of devices...
id	name
1	your_local_workstation
To reinstall a device, enter the id (leave blank to set up a new device):
Don’t type any number. Simply press Enter as suggested to set up a new device. It will ask for the name of the device. Enter a descriptive name, something like myapp-droplet. Wait until the end of the syncing process. It may take several minutes, be patient!
Let’s create a folder for our DB backups
mkdir /home/dokku/db_backups
Then we include this folder in SpiderOak:
SpiderOakONE --include-dir=/home/dokku/db_backups
The output should look like this:
Including...
New config:
Current selection on device #2: u'myapp-droplet' (local)
Dir:/home/dokku/db_backups
Dir:/root/SpiderOak Hive
ExcludeFile:/root/SpiderOak Hive/.Icon.png
ExcludeFile:/root/SpiderOak Hive/Desktop.ini
ExcludeFile:/root/SpiderOak Hive/Icon
ExcludeFile:/root/SpiderOak Hive/.directory
Great, SpiderOak is all configured! Time to setup our database backups.
Create a shell script
Create a new file in /home/dokku and name it backup_db.sh. Paste the following:
#!/bin/bash
/usr/local/bin/dokku postgres:export myapp  > "/home/dokku/db_backups/myapp-`date +%Y-%m-%d`.dump"
/usr/bin/SpiderOakONE --batchmode
exit
Give the correct permission to the file:
chmod +x /home/dokku/backup_db.sh
As you can see, we use our Dokku postgres plugin to dump our db and we gzip the result in our db_backups folder. Then we run SpiderOakONE with the –batchmode flag to make it do its thing and shutdown immediately after.
Setup a cronjob
To automate our DB backups, we’ll add a cronjob.
crontab -e
Add the following line, save and exit:
0 5 * * * /home/dokku/backup_db.sh OUT_BACKUP 2>&1
It will run our backup script at 5am everyday. That’s all we need for now. Hmm… perhaps you don’t want to wait at 5am just to test if the script works. In this case, run the script directly.
cd /home/dokku
./backup_db.sh
The call to “SpiderOakONE –batchmode” will probably make this command run slowly. I don’t know what SpiderOak is doing exactly but sometimes it can take several minutes to complete the syncing.
Once it finally completes, go back to your local workstation to see if you can find your backup.
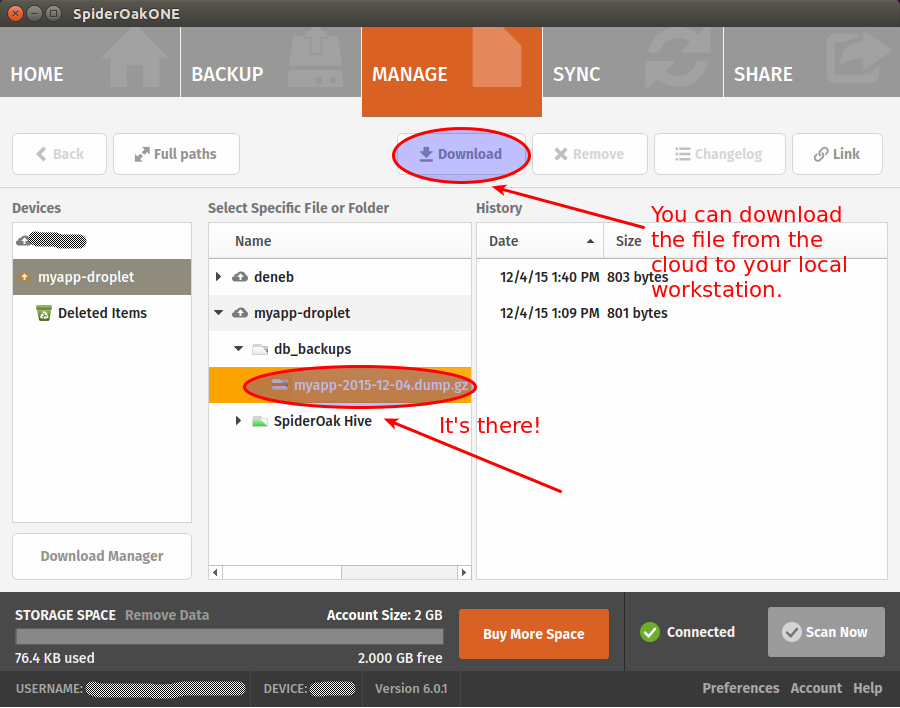
If you want, you can make sure that you are able to restore your backup before calling it a day (have a look at the dokku postgres:import command to that end). Restoring postgres databases usually gives of warnings but it’s generally safe to ignore them. Still, you’re better to make sure everything work as expected.
That’s it! You now have automated database backups on a zero-knowledge cloud architecture. Hope you enjoyed this tutorial! As usual, your comments are much appreciated.
↧
Rails isn't trendy anymore. Hooray for Rails!
When Ruby on Rails was the most trendy thing in the web development world, I felt so cutting-edge! The coolest thing to develop with was Rails and I was developing with Rails. This meant I was the coolest guy living on the earth!
Things have changed. Rails is still alive and strong, but it’s not the flavor of the day anymore. As a freelancer I have the chance to decide to build my new projects using promising technologies such as MeteorJS, React or Angular. In actual truth, I did consider this option as I had that fear lurking in me, you know, that fear which was telling me that If I’d stick with Rails for too long, I would soon become a relic.
But then I remembered that I loved ruby way more than Javascript. And I remembered how pleasant it was to work with Rails. And I remembered how proficient I had become working with this framework along the years. What a waste it would be to drop it all just to use what is popular at the moment. I also believe that rendering HTML and CSS is a job for the server and that sprinkling some Javascript on top of a web application is more than enough most of the time. I still think single page applications are great and have their use-cases but have a tendency to be used even when it feels out of place (content based websites, apps with very little user interactions, etc). I might be wrong, but this is where I stand today.
Today, Rails has something very valuable it didn’t have at the beginning: maturity. It feels so good to use such a polished and solid framework that has proven its merits again and again throughout the years. The community is still very strong and friendly and I’m extremely glad to be a part of it. Rails 5 will soon be released and I’m still excited as I was when Rails 3 was just around the corner.
I am going to leave you with something to meditate:
Ruby and Rails are like a couple of lovers: Ruby is the beautiful woman, the precious jewel, the inspiration. And Rails is the man, the hero, the guardian who protects the jewel and make it shine even brighter.
Now, that’s something. How poetic is that! Can we say the same about Javascript?!
UPDATE
Hey, even Matz think this was poetic! 
↧
Testing Rails applications in the life of a freelancer
Update February 13th: Join the discussion on Hacker News
If you’re part of the Ruby On Rails community for a long time, you’ve probably read tons of articles about testing Rails application (less these days, though). Although there always have been diverging opinions on the matter, it seems the common wisdom was to say that you had to test everything: models, controllers, views and full-stack tests. Oh, and you had to do all of this with a TDD/BDD mindset as well.
I tried to do this myself and quickly concluded it would lead me right into the abyss. You see, it took me way too long to accept that being a freelancer was not the same as being employed in a trendy company with lots of money and resources. Employees will get paid anyway. If they want they can easily convince themselves and their bosses that testing ERB templates and getting 100% code coverage is the most essential thing in the world. In the past I even heard people say that “every real developers” were striving for 100% code coverage and that “they could not even imagine” a rails developer today not doing TDD. At some point it became a sort of religion. You had the heroes on one side, those who wrote more tests in their lives than actual code, and on the other end you had the “undesirable”, those lazy and bad programmers not committed enough to testing.
If I am all by myself, every single thing I do in my work has to bring me real value, otherwise I am losing my energy, time and money.
One day, I was writing a controller spec to make sure that calling the “index” method with a “get” request would return a 200 status code when I realized how absurd it was.
What the heck was I doing? Where was the value of this test? There was none. If the index method returns a 404, it’s because I didn’t create the damn template yet. Why would I deploy my application at this stage? Someone could object that this test will be useful if I somehow delete the index template by mistake. But come on, do we really want to write tests to defend against this kind of stuff? I know I don’t.
Even though I know there are probably ways to write more valuable controller tests, I decided to drop them and concentrate on other tests. Testing views prove to be an even greater waste of time so I dropped them as well.
What was left for me to test? Unit and full-stack tests. Both give me value but of those two, full-stack tests prove to be the most valuable of all.
Full-stack tests are the ones who give me the most value
For me the main purpose of testing is just to obtain an acceptable level of confidence in my overall application. I don’t want (and don’t have the time) to test every single object on every single case in every single part of the stack.
Here is my preferred and almost too simple workflow:
- Think about the feature
- Write the feature
- Test the feature (RSpec and Capybara)
- Deploy with acceptable level of confidence
The testing part is in #3 exactly where it belongs. That’s right, this means no TDD for me. Doesn’t mean TDD isn’t good, it just means it isn’t essential in order to write good and solid code. Experience and some programming skills is what it takes to do that. And whilst it’s true that I could reverse the order of step #2 and #3, the thing is that with me the “thinking” part often blends with the “writing” part. I think the overall feature, then I start writing and continue my thinking along the way, improving the solution I had thought up initially. When I’m happy with the result, I add my feature tests.
Also, even if Full-stack tests are valuable to me, I don’t test everything. Again, time is my most precious resource, I don’ want to waste it in testing mundane stuff.
My tests will target the specific features I am writing on a given project. The workflow of the feature is what matters more to me. I will write tests to make sure that everything happens in the correct order, and in the correct manner as it was thought up by my brain (Thinking. That’s point #1 in my workflow above!). I will write the “happy path” first and then will write some unhappy tests to make sure that the correct error messages / feedback is given to the user.
Once I have that, I have something valuable and it’s enough for me. I can forget the project and come back a few weeks/months later with a level of confidence high enough to refactor or add new features.
↧
Remain professional even after your death
It may sound like a joke, but despite the strangeness of this post title, it’s actually a pretty serious matter, at least for us freelancers.
Think about all the clients that depend on you for hosting their website. They probably don’t have a clue about how to manage their domain name, or what is a domain name in the first place. They don’t know where their data, images and documents are stored exactly. Chances are they don’t care. They don’t care because they know that you are the one who tie all the components together and make it all work. So they want you to be in charge of everything: the domain, the hosting, the database, the backups, etc. They also don’t care whether or not you use 3rd party services like Amazon AWS, Mailgun, Mailchimp, Pusher, Zoho Mail or Google Apps.
Then one day you walk on the street, joyfully tweeting like a little bird, when suddenly the lightning strikes you right on the head, abruptly ending your tweeting and your life at the same time.

As your loved ones mourn your departure and try not falling into deep depression, the telephone rings. Your wife picks it up.
– Hello?
– Ehm, Hello. Can I speak to Robert?
– I’m afraid it won’t be possible. Robert is dead.
– Oh my God… I’m so sorry. I’m guessing he is not in a position to fix the issue with my website then? The domain has expired and no one can access it anymore!
– Well, no, he won’t be able to help you. You know, he is busy being dead and all this kind of stuff.
– Oh I so much understand. But who can help me with my website then? Do you know how to renew my domain?
– What is a domain?
– I think it is the thing that ends with .com
– Oh, I don’t know how it works. I can have a look at his computer and try to help you but I’m not sure I will be able to fix the problem for you.
– …
– …
Do you want your wife, your husband, your kids or anyone else to ever have to deal with this kind of stuff? Unless you were a very bad person when you were alive, your loved ones will have a hard time accepting that you are gone. The thought of seeing them struggle to help your former clients during these hard moments is not very pleasing, isn’t it?
Companies don’t have this problem. In a company, there are obviously more than one person and the possibility that everyone die or become invalid at the very same time is unlikely. The freelancer on the other hand is all alone. All the knowledge needed to run his business resides in his brain and in the various online services that he alone knows how to access. He alone knows what vital information each of them contain. If the freelancer disappear, this knowledge is gone for good.
Ponder this for a second:
1. You are dead.
2. Your former clients are left in the dark.
3. Your family might have to clean up the mess for you.
Three strikes. Everybody loses. Not cool.

I was obsessed with this thought until I decided to do something about it. I didn’t want to write some kind of “technical sheet”, hand it to a loved one and explain them how it works so that they know what to do if something bad happens to me. It is still asking too much of them. If I had to unexpectedly depart, I don’t want to bother my loved ones with things like that.
What am I to do then?
The idea I came up with is to prepare an emergency procedure for each of my clients. I won’t go into technical details here. My objective is to discuss the idea of an emergency procedure and perhaps encourage people to think about it. Let’s think for a second about the knowledge and data that must be transmitted to the client if death pays me a visit:
1. Domain name
2. Source code
3. Database
4. Other documents (images, videos, text, etc) that may be stored on the server’s file system or on a 3rd party service like Amazon AWS
5. All 3rd party logins, passwords and api keys (Think about services like Amazon AWS, Zoho mail, SmugMug, etc)
6. A message to instruct the client what to do
Before I describe each of these steps, the very first thing to do is to create an emergency email inbox for your client. You can use an online email service like GMail or hotmail, it doesn’t matter. You will soon see how this inbox will be used.
1. Control over the domain name
If you use a registrar like Namecheap or GoDaddy, you can easily grant accesses to other people for each of the domains you have registered. The thing is, the client will need to have a GoDaddy or Namecheap account to manage their domain name. Personally I am not very fond on the idea of bothering my clients up front with technicalities like this. If I register a new account on Namecheap using the email of my client, they will start receiving emails and wonder what this is all about. That’s the main reason for creating an emergency inbox for your client (e.g. emergency_clientid@yourdomain.com). Then you use this address to register a new account on Namecheap/GoDaddy/Other. Finally, using your own account, you grant full access over the domain name to the newly created account.
2. Control over the source code
If you host your source code on Github or Bitbucket, you simply have to do the same thing you did for the domain name. You go to the repository settings and you give access to your client (always using our emergency email address). I think a read-only access is enough in this case. The future commits on this repository should be made on a new user account anyway.
3. Control over the database
This one might be trickier. Unlike the Domain name or the source code, there is no online service that will do everything for you. You have to find a way to either A) send the most recent backup or B) create a SQL dump on the spot. I prefer the second option. A nice way to tackle this is to create a new route on your client website to actually download the database. Example: mysuperwebsite.com/SOMEUNIQUEID. Of course, the access to this URL needs to be protected. After successfully authenticating, the client clicks on a button which will trigger a shell script that dumps the database, gzip the content and sends the file back to your client.
You will want to be extra careful and make sure that the code you write for this is rock solid. If it fails, your client might have no other way to recover its data. I would personally set up a script that runs periodically to make sure that everything functions properly.
4. Other documents
Perhaps your client’s website allow users (or administrators) to upload their own documents? If these documents are stored on a 3rd party cloud platform like Amazon S3, the client needs an access to its bucket. This means you need to create an Amazon S3 account on their behalf (like we did for the domain and the source code). You can then share the S3 bucket with the client using bucket policies or ACL. Really soon though the client will need to have a bucket on its own account and import the data in it because, one day or the other, I guess Amazon terminates the account of deceased people as they have a tendency of not paying their bills. This is something that the new developer(s) who will replace you should be able to figure out on their own. If they don’t and the bucket becomes unusable after awhile… well they’ll have to deal with the Amazon support. Hey it’s not like we didn’t do our part already!
If website documents are stored on your server file system, your need to find a way to send these to the client upon request. I think the solution discussed concerning the database (above) could be used for downloading the documents as well.
5. 3rd party services
We need to make sure that all online services used by the website (if any) can be managed by the client. The procedure will depend on each 3rd party service but generally, it will be a matter of creating the accounts using the emergency email address.
6. Write a simple how-to message
The last thing we should do is writing a message to the client explaining them what to do in case you (the freelancer) becomes physically unable to manage the website anymore. But here is the good part, there is no need to be all technical about it. Your client will have to find another developer / team to take care of the website, so in actual truth our how-to message is for them. It’s fair to assume that THEY will know how Amazon S3 works or how to restore a Postgres SQL dump. Our part is only to transfer them the data and knowledge required to make the website function correctly.
Our how-to message could look more or less like this:
Hello Client Name,
Here is all the required information you will need in case I become physically unable to take care of your website (death, accident). Once you found someone else to replace me, I suggest that you forward this current message to them.
1. Technologies used
Server side programming language: Ruby On Rails
Database : Postgresql
Client side tools used: CSS3, HTML5, Javascript
2. Download your database
To download your database, go to the following url: —————- and enter this password: ———–
3. Get your copy of the source code
The repository is hosted on ——-. You can access it by logging in using the following credentials: ——
4.
….
Sincerely,
Your name
This message should be sent to the emergency email address that we have created earlier. Finally we send a message to our client using their current email address, instructing them that we have created an emergency procedure. We give them the login info to access their emergency inbox, encouraging them to write it down on a sheet of paper and store it in a safe place.
I like this idea because you don’t scare your clients up front about the technical aspects. You simply let them know that such a procedure exist and how they can access it in case something goes terribly wrong.
Having such a procedure will give some peace of mind to everyone: You, your client and your loved ones. I’d love to read what you think about it. Your comments are appreciated!
↧
↧
Deploy your Rails applications like a pro with Dokku and DigitalOcean
UPDATE December 14th, 2018.
This tutorial has been updated to target Dokku version 0.12.13.
After reading this tutorial, you will be able to:
- Create your own server (droplet) on the cloud using the DigitalOcean cloud architecture. (I will also share with you a link that will give you $10 credit at DigitalOcean).
- Install your first DOKKU plugin. In this case, a Postgresql database plugin
- Automate your database migrations using the app.json manifest file
- Create a swap file to prevent memory issues when using the cheapest droplet type (1 GB)
- Setup zero downtime deployments using the CHECKS feature
- NEW: Remove unused containers to make sure there is always enough space on your droplet
I’ve tested each step of this tutorial multiple times so you should not run into any issues. If you do however, please leave me a comment at the end of this post and we will sort it out together!
Heroku has become the standard to host Ruby On Rails web applications. It is understandable because Heroku has such a great infrastructure. Deploying is a matter of typing “git push heroku master” and you’re pretty much done!
The thing is, if you are part of a small development team or you are a freelancer, the cost of using Heroku for all your clients / projects might become a real issue for you. This is where Dokku comes in! But what is Dokku?
The description on the Dokku home page is pretty self-explanatory:
The smallest PaaS implementation you’ve ever seen. Docker powered mini-Heroku in around 200 lines of Bash
So, there you have it. A “mini-heroku” that you can self-host or, better perhaps, use on an affordable cloud infrastructure such as DigitalOcean (use that previous link to get a $10 credit). Small teams and freelancers can now deploy like the pros at a fraction of the cost. Follow this tutorial and soon, you too, will be able to deploy your Rails apps simply by typing: git push dokku master. How neat is that? Sure you will have some configuring to do, but the overall process is not that complicated. This tutorial will show you how to get there.
Get your $10 credit here:

Are you ready for the tutorial…?

DigitalOcean
First, create the droplet on DigitalOcean.

Then you have to choose the size of the droplet. Let’s choose the cheapest option (Small teams and freelancers love cheap options. We’re broke!)
Choose your image! Don’t miss this step, it’s very important. Don’t choose a Rails preset or a Ubuntu image. Remember, we want Dokku!

Add your ssh key(s) for a more secure access to your droplet.

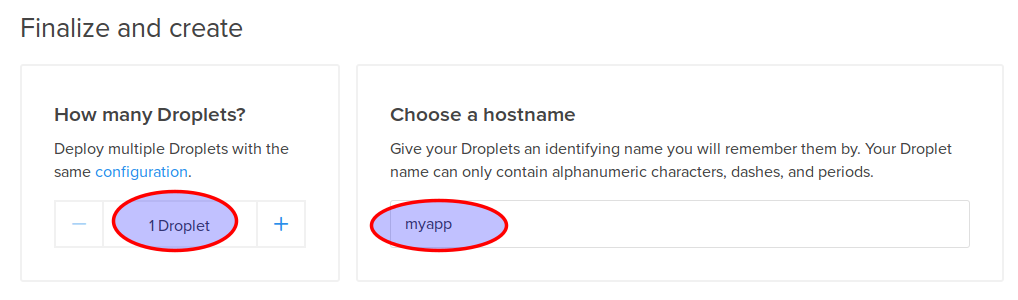
Then select the number of droplets to create and choose a hostname
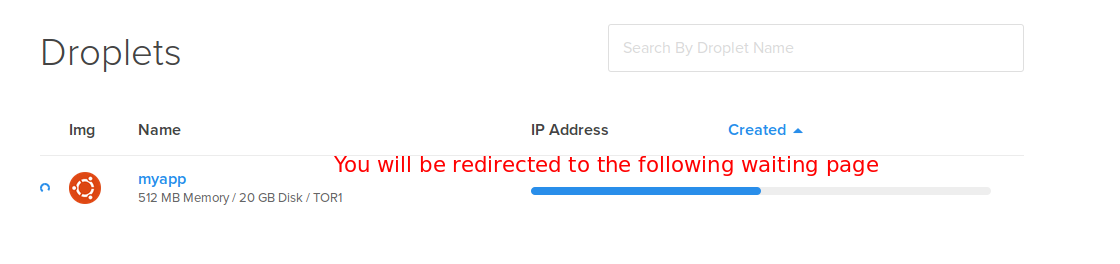
Finally, click on the “Create” button and wait until your droplet is fully created!
The DigitalOcean part is done. Now we have to make sure we can log in to our droplet
Connect to our droplet via SSH
Open a terminal window and connect to your droplet, like this:
ssh root@your-droplet-ip
Make sure the Dokku user can connect using your SSH key as well
When you will deploy your app with git, the “dokku” user will be used instead of root, so you need to make sure that this user can connect to your droplet. I’m not sure if this is supposed to be configured automatically when you create your droplet, but it didn’t work for me. Have a look at the file located in /home/dokku/.ssh/authorized_keys (on your droplet). If it’s empty like it was for me, run this command:
cat /root/.ssh/authorized_keys | sshcommand acl-add dokku dokku
Add a swap file!
Since we chose the cheapest option (1 GB), we might run into memory problems when we will deploy our Rails application. Rails assets compilation will make your deploy fail. Don’t worry though, your web application will still be running smoothly. What’s the solution if we are determined to use our cheap 1G droplet? Simple, we just add a swap file as explained in this StackOverflow answer. What follows is (almost) an exact copy of that answer.
To see if you have a swap files:
sudo swapon -s
No swap file shown? Check how much disk space space you have:
df
To create a swap file:
Step 1: Allocate a file for swap
sudo fallocate -l 2048m /mnt/swap_file.swap
Step 2: Change permission
sudo chmod 600 /mnt/swap_file.swap
Step 3: Format the file for swapping device
sudo mkswap /mnt/swap_file.swap
Step 4: Enable the swap
sudo swapon /mnt/swap_file.swap
Step 5: Make sure the swap is mounted when you Reboot. First, open fstab
sudo nano /etc/fstab
Finally, add entry in fstab (only if it wasn’t automatically added)
/mnt/swap_file.swap none swap sw 0 0
Great, now we have our swap file. What’s next?
Create our application in Dokku
If you type the dokku command, the list of commands for dokku will be displayed on the screen. You should study it as it is very instructive, but for now we will simply use the dokku apps:create command to create our application.
dokku apps:create myapp
This will create a container for your new app.
Database? Sure, let’s use Postgres
To interact with a postgres database on Dokku, you need to use a plugin. Update december 2018: I’ve now changed the postgres plugin I use since the old one does not appear to be in active development anymore.
dokku plugin:install https://github.com/dokku/dokku-postgres.git postgres
Once it’s installed, feel free to type dokku postgres to see all available commands. Let’s create our database:
dokku postgres:create myapp
A new service called myapp has now been created. The next step is to link it to our application which happens to have the same name.
dokku postgres:link myapp myapp
Done! If you look at the output of this command, you will notice that an environment variable called DATABASE_URL has been configured. This will be your connection string to access your postgres database from your Rails app.
Speaking of environment variables…
Thanks to Ariff in the comments for asking questions about environment variables. The following section is a recap of what was discussed in the comments.
To configure a new environment variable for a given application, you do the following:
dokku config:set myapp SOME_SECRET_VAR='hello'
Note that you don’t have to manually set the SECRET_KEY_BASE environment variable which is used in the secrets.yml file of your Rails application. This is because the ruby buildpack already does this for you. As you can see in the source code, SECRET_KEY_BASE is set to a randomly generated key (have a look at the setup_profiled and app_secret methods).
Create our Rails app locally
Switch to your local workstation and create a new rails app.
  rails new myapp
  cd myapp
  git init .
Add a git remote to your Dokku application
git remote add dokku dokku@your-droplet-ip:myapp
Open your database.yml and add your Dokku environment variable:
#...
production:
  adapter: postgresql
  url: <%= ENV['DATABASE_URL'] %> #This is the environment variable created by our Dokku command earlier
  encoding: unicode
  pool: 5
Off topic: Why not take this opportunity to use environment variables for all your secrets?
As for the Gemfile, make sure it has the following lines:
ruby '2.5.1' #or any other ruby version
gem 'rails_12factor', group: :production #rails library tuned to run smoothly on Heroku/Dokku cloud infrastructures
gem 'pg' #postgres gem
#...
We will also create a default controller to have somewhat of a functioning application. On your local worstation, run:
./bin/rails g controller static_pages
Create a new file named home.html.erb in app/views/static_pages and add the following:
<p>Hello world!</p>
In routes.rb, add:
root 'static_pages#home'
Are you ready? Run bundle install, commit everything then type:
git push dokku master
If you did everything correctly, you should see something like this after you pushed to dokku.(I edited the output to keep it brief).
-----> Discovering process types
 Default types for -> worker, rake, console, web
-----> Releasing myapp (dokku/myapp:latest)...
-----> Deploying myapp (dokku/myapp:latest)...
-----> Attempting to run scripts.dokku.predeploy from app.json (if defined)
-----> App Procfile file found (/home/dokku/myapp/DOKKU_PROCFILE)
-----> DOKKU_SCALE file found (/home/dokku/myapp/DOKKU_SCALE)
=====> console=0
=====> rake=0
=====> web=1
=====> worker=0
-----> Attempting pre-flight checks
 For more efficient zero downtime deployments, create a file CHECKS.
 See http://dokku.viewdocs.io/dokku/deployment/zero-downtime-deploys/ for examples
 CHECKS file not found in container: Running simple container check...
-----> Waiting for 10 seconds ...
-----> Default container check successful!
-----> Running post-deploy
-----> Configuring myapp.myapp...(using built-in template)
-----> Creating http nginx.conf
-----> Running nginx-pre-reload
 Reloading nginx
-----> Setting config vars
 DOKKU_APP_RESTORE: 1
-----> Found previous container(s) (3594ff49f81c) named myapp.web.1
=====> Renaming container (3594ff49f81c) myapp.web.1 to myapp.web.1.1544803301
=====> Renaming container (40f628df49af) quizzical_raman to myapp.web.1
-----> Attempting to run scripts.dokku.postdeploy from app.json (if defined)
-----> Shutting down old containers in 60 seconds
=====> 3594ff49f81c171fefe56bca68742d98cde2cd18d5111b28d4ea32ed5e59afe9
=====> Application deployed:
 http://myapp.myapp
Obviously if you type myapp.myapp in the browser, it will not work. What you have to now is to point a domain to your new droplet.
Configuring a domain
If you don’t have any top level domain, the fastest way would be to add a subdomain record for one of a domain that you own. Then have it point to your droplet IP.
Once you’ve done that, run the following command on your dokku droplet
dokku domains:add myapp example.yourdomain.com
Open a browser and type example.yourdomain.com. You should see an ugly “Hello World!”, congratulations!
Configure pre-flight checks
Something might have caught your attention when we deployed our application:
-----> Running pre-flight checks
       For more efficient zero downtime deployments, create a file CHECKS.
       See http://progrium.viewdocs.io/dokku/checks-examples.md for examples
       CHECKS file not found in container: Running simple container check...
Checks in Dokku are a way to setup zero downtime deployments. You don’t want your users to get an error page while your server is restarting. Since we have not created any custom check, dokku run a default check that simply make sure that the new container is up and running before pointing to the new app. The problem is it will not check if puma has been fully loaded. Let’s create a super simple check to make sure our Rails application is available.
At the root of your app, create a file named CHECKS and add the following:
WAIT=8 #Wait 8 seconds before each attempt
ATTEMPTS=6 #Try 6 times, if it still doesn't work, the deploy has failed and the old container (app) will be kept
/check_deploy deploy_successful
Important: Leave an empty line at the end of this file, otherwise Dokku might not detect your check. Is this a bug? I don’t know… but it took me a while to figure this one out!
Now create a file called check_deploy in your rails public directory and add the text:
deploy_successful
In other words, dokku will try 6 times to obtain the “deploy_successful” string after calling “/check_deploy”.
Push everything to dokku and verify the output. You will probably see something like that:
-----> Running pre-flight checks
-----> Attempt 1/6 Waiting for 8 seconds ...
       CHECKS expected result:
       http://localhost/check_deploy => "deploy_successful"
-----> All checks successful!
Database migrations
Before Dokku 0.5, it was not really possible to have your database migrations run automatically on deploy. You had to do it in two steps. First you deploy, then you migrate by typing: ssh root@your-domain dokku run myapp rake db:migrate
Fortunately, we can automate the process now that Dokku supports the app.json manifest file. Create a app.json file in the root of your repository and add this:
{
  "name": "myapp",
  "description": "Dummy app to go along the dokku tutorial found on rubyfleebie.com",
  "keywords": [
    "dokku",
    "rails",
    "rubyfleebie.com"
  ],
  "scripts": {
    "dokku": {
      "postdeploy": "bundle exec rake db:migrate"
    }
  }
}
Let’s create a dummy model to see if the migrations will be run.
./bin/rails g model Book

You can then migrate your database in development if you want. Once it done, commit and push to dokku. the output should look like this:
-----> Running post-deploy
-----> Attempting to run scripts.dokku.postdeploy from app.json (if defined)
-----> Running 'rake db:migrate' in app container
       restoring installation cache...
       Migrating to CreateBooks (20160405194531)
       == 20160405194531 CreateBooks: migrating ======================================
       -- create_table(:books)
          -> 0.0139s
       == 20160405194531 CreateBooks: migrated (0.0142s) ==========
How cool is that? I hoped you enjoyed this tutorial. Your comments are appreciated!
Ready to use in production? Make sure to clear old and unused containers from time to time!
If you want to use Dokku in production, make sure to remove containers no longer in use, because the underlying Docker platform WILL NOT automatically delete them for you. If you don’t, the space on your droplet will grow and will ultimately crashes your app! Fortunately, in newer docker versions, pruning old containers is very easy, simply run the following command once in a while:
docker container prune
If you are using an older version of Docker and the prune command above does not exist, there is another way to clear unused containers. Have a look at this SO answer.
Troubleshooting
Dushyant in the comments had some errors on deploy. He found out that his problem was related to the numbers of containers configured when using DigitalOcean 5$ plan. I didn’t run into this problem myself, so here is what Dushyant says about it:
« Finally I found the solution. My previous solution got me working but ultimately that wasn’t the true solution.
It is happening because of containers and because of 5 dollar plan.
You can get the list of containers by this command
docker ps
Then remove the unwanted containers
docker rm -f docker_id »
What’s next?
How about automating your database backups and storing them on a zero-knowledge cloud architecture?
↧